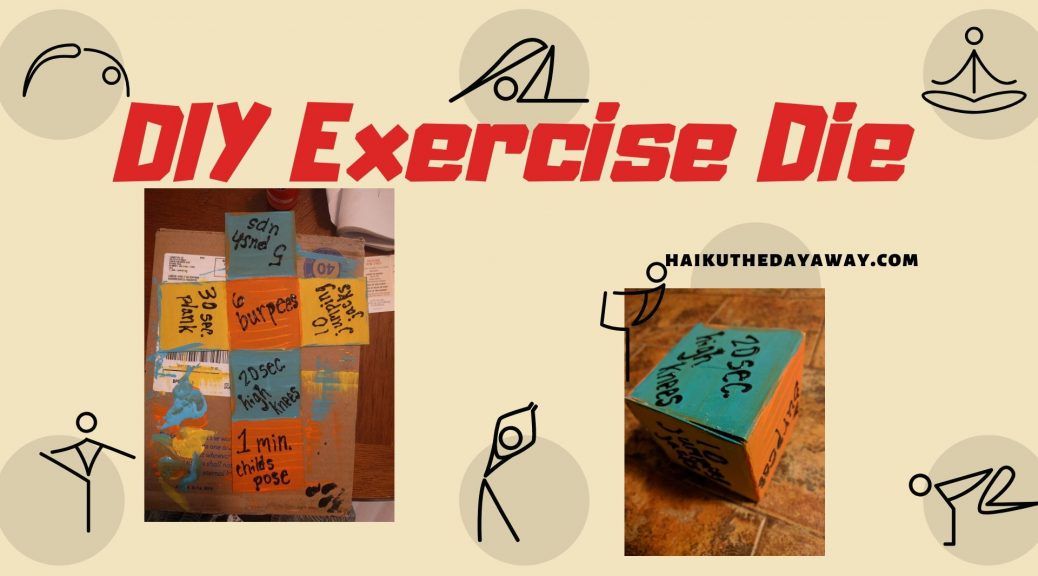
Browsed by
Category: Tutorials

DIY Exercise Die

DIY Exercise Die

I made this exercise die for two reasons:

1.) I want to exercise more, but often I forget because I have four small children and am terrible at routines, so the time I have for exercise usually just passes.

2.) My kids love to move and I thought it would be great for homeschool breaks.

I actually made this about a year ago, and it has held up pretty well. I had to reattach one side, and my kids have peeled off a little of the puff paint, but these are easy fixes.

Materials:

  • 1 Cereal Box
  • Craft Paint
  • Puff Paint
  • Hot Glue Gun and Sticks

Directions:

1.) Cut one side of the cereal box away from the rest of the box so it lays flat on a table.

2.) Measure six squares that are all equal sizes. I used an oversized Cheerios box from Costco, and my squares are all about 2.5″

3.) Cut out the cross-shape. Paint to your liking.

4.) Puff Paint whatever exercises you think would be best for you or your kids or family.

6.) Fold along all the lines so that when you’re gluing the exercise die together, you don’t put pressure on the whole thing.

7.) Hot glue along the open seams.


8.) Take turns tossing the die in the air, and do whatever it says!

DIY Book Stack Christmas Ornament

DIY Book Stack Christmas Ornament

Every year, my husband and I get our children Christmas ornaments. Our goal is to somehow capture the year in an ornament so that over time we have a nice stack of memories when we decorate the tree. Sometimes this is really easy, like last year when we went to Willamsburg and let our children pick out their own ornaments from a store called “Christmas Mouse.”

This year, I wanted to make our children’s ornaments, but I had a hard time deciding what that would look like. It was only a few days before Christmas when I finally made them. Sometimes it seems that deadlines are incredible creativity boosters. Do you agree?

Ultimately, I chose to make these:

****************************

For the footie pajamas, I cut two pieces of felt and glued them together with felt glue so that it would be double-sided. I put the ornament hook inside so that it would be secure enough to hang on the tree.

For the beaded heart ornament, I cut a length of jewelry wire and formed it into a heart, then strung pony beads onto the wire. I had to keep manipulating the wire as I went to keep the shape. I also added an anatomical heart charm (I had this lying around because I had purchased it–from Etsy–a couple of years ago but never used it for anything.)

For the elephant, I wish that I had taken pictures along the way. I honestly was not really sure that it would turn out. For the legs, I cut narrow strips of felt and rolled them up like a cinnamon roll, then sewed the seam closed. For the body, I cut out a kind of oval/rectangle shape and stuffed it with scraps of felt (I thought this would be better than pillow stuffing because it wouldn’t be pulled out as easily should my hand sewing not be precise.) I sewed the body closed on all sides, folding the fabric to my liking. For the head, I cut two pieces of felt in the general shape of an elephants head, and then adjusted until I was satisfied. I stuffed it with just a little piece of felt to give it dimension.  The ears are flat and so is the tail. I looked up images of elephants so I could keep the right proportions for all the body parts.

****************************

The following tutorial is for my 8-year old’s ornament: the book stack.

When I told my husband about my idea for a book stack ornament, I described to him a stack of little blocks of wood, with certain titles painted on the sides, as if the books were closed up and sitting on a table somewhere. I asked my husband if he could cut the wood for me. There were a couple of problems: it was too close to Christmas to accumulate the wood and cut it and then sand it down and paint. We kept thinking. My husband made a comment, wondering if I could bind a book for our son. That comment brought this ornament to life. While I made it, I took photos. Here I am to share this process with you.

Materials:

  • Scrapbook paper or Cardstock
  • White paper (printer paper is probably a little too thin for this, but it may work if you’re careful with it. Cardstock is likely too thick for the inside pages. I had some in between paper that I tore out of a sketchbook.)
  • Scissors
  • Paper Cutter/Trimmer (optional, but it will just help you keep your edges very straight)
  • Needle
  • Thread
  • A Pen/Other Drawing or Writing Utensils (I used a black Tombow brush pen, and Prismacolor colored pencils.)
  • 1 Popsicle Stick
  • Tacky Glue
  • Crafter’s Tape

Directions:

1.) Cut out nine 5.5cm x 4cm sheets of white paper. These will be your book pages. I made three books, each with six pages. You could use more or less depending on how big you want your books to be.


2) Cut out your book covers. You should use a thicker paper for the book covers, and they should be just slightly bigger than the book’s pages. My covers were actually colored on one side and white on the other, but I wanted them to colored on both sides. So I cut out two covers for each book and adhered them together with crafter’s tape. You could use a paper that is double-sided, or just go with a white inside cover.

When you fold the book pages in half and the book covers in half, it will look like this:

3.) This is the step where you will bind the books. If you’ve never tried to sew paper before, don’t worry! You can do this! I started by threading my needle and then doubling the thread over, tying it to itself at the end so that it would not become unthreaded in the process of binding these books.

I poked a hole on the inside of the book cover, near the top, but behind the pages. It was a little difficult to push the needle through, but with some gentle finger strength, it did! Then I sewed through all of the pages and the cover, and tied a knot. Then I continued sewing down the fold until I was satisfied by the structure of the books. I went down and then back up, so that I could tie my thread where I had left a little bit of extra thread at the top.

4.) Decorate your book covers. You may decorate the inside pages, too, if you’d like.

I chose to make three books: Johnny Tremain, Harry Potter, and Diary of a Wimpy Kid because these are three books that my 8-year old has read this year. He’s read multiple Diary of a Wimpy Kid books, and he’s read all of the Harry Potter books and he loves them all. He’s reading Johnny Tremain for homeschool, and he has told me that he likes it. It’s a special book because he reads one chapter and then brings it to me to tell me what he’s read. This is a beautiful time that I get to spend with him, listening attentively. I write down what he tells me, and I’m going to type it all up for him once he’s read the whole book.

Inside each book, I wrote a few things about why he’s reading these books (such as, his cousin was reading Diary of a Wimpy Kid and told my son about it.) In the Harry Potter book, I drew a lightening bolt on one page and Harry Potter’s circle glasses on another. In the Johnny Tremain book I wrote how he reads a chapter a day and narrates it to me.

5.) I wanted these books to hang vertically, so I basically made a big mess trying to tie them to each other. They were still very floppy, so I glued a popsicle stick to the back. I used tacky glue, but Elmer’s would likely work as well, or even glue dots or almost any glue that is good for paper. I tied a loop at the top of Johnny Tremain with the excess string, but I will attach an ornament hook to actually hang it on the tree. I left the strings on mine, but you could cut yours off. I kind of liked the strings because I thought they looked like bookmarks.

I hope you enjoyed this tutorial and the little story about our ornament tradition. Creativity is such a process but absolutely rewarding when something turns out right!

Let me know if you have questions or if you try this at home!


DIY Birdseed Ornaments

DIY Birdseed Ornaments

When I began this blog, I said that I wouldn’t do tutorials. Then, I made birdseed ornaments with my kids and I thought I would share them with you.

Here’s why I want to share these: I tried to make them last year. They were cute but crumbly. I don’t remember what kind of fat I used, but it may have been coconut oil. Whatever I used didn’t keep the ornaments together. Then, a couple months ago, I saw a picture of birdseed ornaments that were left inside of metal cookie cutters and hung on trees just like that. Genius, right? I was inspired to try once again.

Without much preparation, I’ve simply had this thought floating around in my head. This happens a lot with me– does this happen with you?– where I just think about doing something for a while until BAM! It’s time, and I go for it. Sometimes (okay, a lot of the time) this ends in failure because I either don’t have the supplies I need, or somewhere in the process I just decide against it.

Last week in our homeschool, the day arrived. It began with a couple of psalms and some watercolor painting. It continued with a penmanship lesson and a math lesson. Then, I just knew it was time to get outside, and I know making birdseed ornaments would get us there because we’d have to go outside to hang them. I told one kid to get the birdseed, another kid to scrape the lard out of a jar, and still another child to cut apart our paper towel rolls.

–Why, yes, I do have a cabinet full of paper towel rolls. Do you need one?–

I had previously looked through our stash of cookie cutters only to find one rusty metal ornament. I thought we’d spread lard and birdseed on the outside of paper towel rolls, and I was preparing for this adventure when I had an idea.

–Are you ready for this?!–

We would cut the toilet paper rolls even narrower and fill them, as if they were the cookie cutters we had wanted all along.

The afternoon was a raging success, so here I am to tell you how we did this. Please let me know if you’ve ever made these. Or, let me know if you try my technique. I am fascinated!

Materials:

1 Cup of lard, melted
2 Cups of filling (birdseed, and add in seeds and dried fruits as you like)
Paper towel or toilet paper rolls, cut into 2-3 inch wide pieces.
A cookie sheet or other portable hard surface
Natural hemp cord

Simple, right? Well, yes. Read on for some secrets I discovered while making these cuties.

The lard I used was homemade. My husband made it a few months ago out of really good, local beef parts and it’s been sitting in our refrigerator since. I don’t really know what he used or how he made this lard, but I’m sure recipes exist somewhere. Else, you could hop on over to your local grocer and purchase some for cheap.

SO, we melted the lard and then I measured it to make sure that we had the amount we needed.

We made the filling: as much birdseed as we had, then added some raisins and sunflower seeds from our pantry.

I lined a cookie sheet with an old cereal bag (my grandma always saved these because they are the perfect surface for rolling out pie crusts, so I save mine too.) You could use wax paper or parchment paper, or you could just do this right on your cookie sheet. I just didn’t want a big lard mess to clean up, so I lined my cookie sheet with a cereal bag before beginning.

My three-year old scooped the birdseed into our paper towel roll ornaments.

Here’s where ingenuity kicked in and surprised me.

I cut straws to make holes in the ornaments, so we could string some hemp cord through them later.

**This part is important! I kept the straws in place and strung the cord through the straws. This made it much easier to get the cord through the ornament because straws are smooth and birdseed is not!

For the most part, the cord went through easily, but on a few of these, I had to first remove the straw and use a nearby stick to poke a hole all the way through the last end-piece of hardened lard-birdseed.

Along the way, I found that lard is sticky and gross, but thankfully it washes off of hands and cookie sheets when you use hot water. I also found that when my hemp cord frayed at the ends, excess lard was useful for acting like a glue to keep the frays together.

One thing I’ve learned over the past year of birdseed ornament fascination is that there are many different ways to make these. Simply, I was excited to finally find one that worked for me without becoming a crumbled mess.

My daughter was really excited today when she saw birds munching on these ornaments. Though I couldn’t get a photo of that scene, if you make these ornaments you’ll likely have something far better than a photo to watch.


5 Reasons to Build Tiny Gingerbread Houses (With a Free Pattern!)

5 Reasons to Build Tiny Gingerbread Houses (With a Free Pattern!)

Every year, Christmas comes no matter what.

Every year, with joy and lights and wonder. And now that we’re adults, Christmas comes with oh so much more. It’s still exciting and wonderful, but there’s also much to do.

I know I’m not the only one who feels this way…

Every year, a list forms in my mind: make ornaments, buy presents and wrap them up pretty, practice random acts of kindness, sing Christmas carols, watch all the Christmas movies, do a Jesse Tree.

These are all things I want to do with my family, but everyday family life is already pretty full. Adding anything extra can make us feel quite busy, and busyness is never the goal. Do you agree?

Yet there is one Christmas tradition that I truly love, one that is scattered trough my childhood memories. It’s the gingerbread house. It’s the mixing of dough and the rolling it out and the cutting of shapes. It’s the handiwork, the teamwork, the using of all my senses. We would pack on too much candy and by the end of the night everyone would feel sick because we’d all eaten way too much sugar. Perhaps what I really love, though, is simply the smell of gingerbread. Put molasses and cinnamon in anything, and I am game! Yum!!

My oldest son asks every year if we can buy a gingerbread house kit. It starts as soon as they hit the shelves and it never stops. While I know this would be the easiest way, I am a stickler for the homemade and I tell him no because we can make one at home with much better ingredients. This year, I got to spend some one-on-one time with him measuring and cutting and creating our pattern (a tiny architecture/STEM lesson wrapped up in the most wonderful aromas!)

Here’s a little peak at the house pattern all cut out and taped together (just with a little bit of tape, since we would be disassembling it to trace onto our dough):

I had plans to try out some healthier gingerbread house dough, but when it came time last Friday to actually make the stuff, I used my trusty Joy of Cooking recipe. (I’m sure that if you want to make your dough, you can use whatever basic cookbook you have, or use the first basic recipe that comes up on google. Perhaps this one from King Arthur Flour. They never let me down.)

One thing I decided to do this year was to cut out enough dough for each person in my family to make their own personal gingerbread house. This would ensure that no one was fighting because someone was messing with their design or because someone’s hands were in the way or whatever.

We gave each of our children a paper plate and a little bowl of candy and we let them decorate their own houses. We sat down alongside our children and decorated our own houses too. Of course, I don’t have photos of our process but hopefully the last two sentences gives you an idea of how we did this.

So, I had the idea to build tiny, individual houses but I wasn’t sure how it would work out. Truly, it was great.

5 Reasons to Build Tiny Gingerbread Houses:

1.) Individual Creativity. No one fought over what kind of design to make because everyone was allowed to do whatever they wanted to their own house.

2.) Fairness. My husband had the brilliant idea to ration out the candy into individual bowls (I used washed yogurt containers, which I always save for things like painting and to-go lunches and now, for building gingerbread houses). This way, everyone was sure to get the same amount of goodies and no one complained that “So-and-so ate all the peppermints.”

3.) Preventing Candy Hangovers. Everyone got an appropriate amount of candy and could do with it what they wanted. Our smallest child ate most of her candy while the rest of us were decorating our houses. We had figured that would happen, but in the end it was fine because she had the same as everyone else.

4.) Structural Integrity. I seem to recall gingerbread houses being finicky, and the roof caving in or the foundation cracking. However, my idea to build tiny gingerbread houses had the added benefit of lighter-weight pieces. Therefore, the house itself wasn’t so complicated to put together and it was absolutely structurally sound.

5.) Easy Icing Glue. Because our tiny houses were not so heavy, we were able to use a simple powdered sugar + milk icing to build them. That’s right, no egg whites! We just made sure the icing was kind of thick so that it would dry faster. We sat down together to build the houses, went downstairs to watch Rudolph the Red Nosed Reindeer, and came back upstairs to do our decorating. That 45 minutes gave the frosting enough time to dry so the candy could be applied without any collapsing. (Note: Because our children are so little, my husband and I basically put the houses together. We applied the icing and helped the kids position their pieces so that everyone would actually end up with a house and not a big pile of crumbs.)

Simple Steps:

***Things you will need to make your own gingerbread houses: Dough, candy, powdered sugar and milk, bowls, paper plates.

1.) Print my FREE TINY GINGERBREAD HOUSE PRINTABLE . Cut out your pattern (I made my pattern pieces with an old cereal box. You can make your pattern pieces with paper, but something heavier will be much easier to work with.)

2.) (Optional) Build the house using your pattern and a few pieces of tape. (While unnecessary, I found that this helped my son and I both see what we were about to do with the gingerbread and to make any adjustments we wanted.)

3.) Make gingerbread dough and roll out to about 1/4″ thickness. I used one recipe of gingerbread dough and we made 5 tiny houses with it, and we had leftover dough that I froze for later use.

4.) Using your pattern, cut out enough pieces of gingerbread to make as many houses as you need. You will need 2 pieces of roof, 2 pieces of side, and 2 pieces of front/back per house Basically, my printable makes one house.

5.) Bake the pieces of gingerbread. When transferring your shapes to the baking pan, be gentle because they will stretch a little (another benefit to tiny houses: if the pieces aren’t perfect, the icing will still be able to hold the house together!)

6.) Once the cooked dough is cool, mix together a few cups of powdered sugar with a little bit of milk (remember, you want the icing thick, so don’t add a lot of milk. A good rule of thumb is to add one tablespoon at a time until your icing is smooth and spreadable.) Now you’re ready to assemble your house!

7.) Once your house is assembled, get out your candy and have at the decorating!

8.) Take lots of pictures and let me know how your houses came out!!